Monday, October 10, 2011

Canvas Prints - DIY

**I originally posted this to my other blog, Enjoying the simple things


I had a harebrained idea at midnight last night, or I guess this morning, to get a project checked off my list. So, I gathered a few supplies, sat down at the kitchen table and got to work.

A while ago
I mentioned that I was going to make my own canvas prints. While you really can print on canvas right through your home printer, I was working with actual photographs. I was determined to get the look of canvas prints without the high price tag. Call me cheap...or smart - whichever you prefer.

Quality gallery wrapped canvas can be expensive. An 11 x 14 with an inch gallery wrap averages about $60.00. You can find discounts here and there but once you start figuring in the thickness of the wrap or custom edge colors, it can increase the price. The work is beautifully done but frankly, I would need 5 and that's $300.00 I could spend elsewhere. Thanks to my
beautiful friend, Alysa, she saved me a ton of dough! I followed her instructions and this is how it went.

Paint the sides of the canvas if you wish, even going over on the top sides of the canvas. Let dry. I used leftover paint from the boys' room.

Using a paintbrush, brush Mod Podge over the entire canvas area.

Place picture on the canvas and glue down. I smoothed it out with my hands. Just make sure they are clean - no oils on the picture. You may also want to use gloves for handling photographs.
Turn over and trim excess with an exacto-knife. My pictures were 11 x 16 but the canvas was 11 x 14 so I had a little to trim.

Now, take the Mod Podge and paint the entire surface of the photograph. Don't worry, just keep spreading the glue and remember Mod Podge is magic! I used a sponge paintbrush but next time I think I'll use a better quality brush.
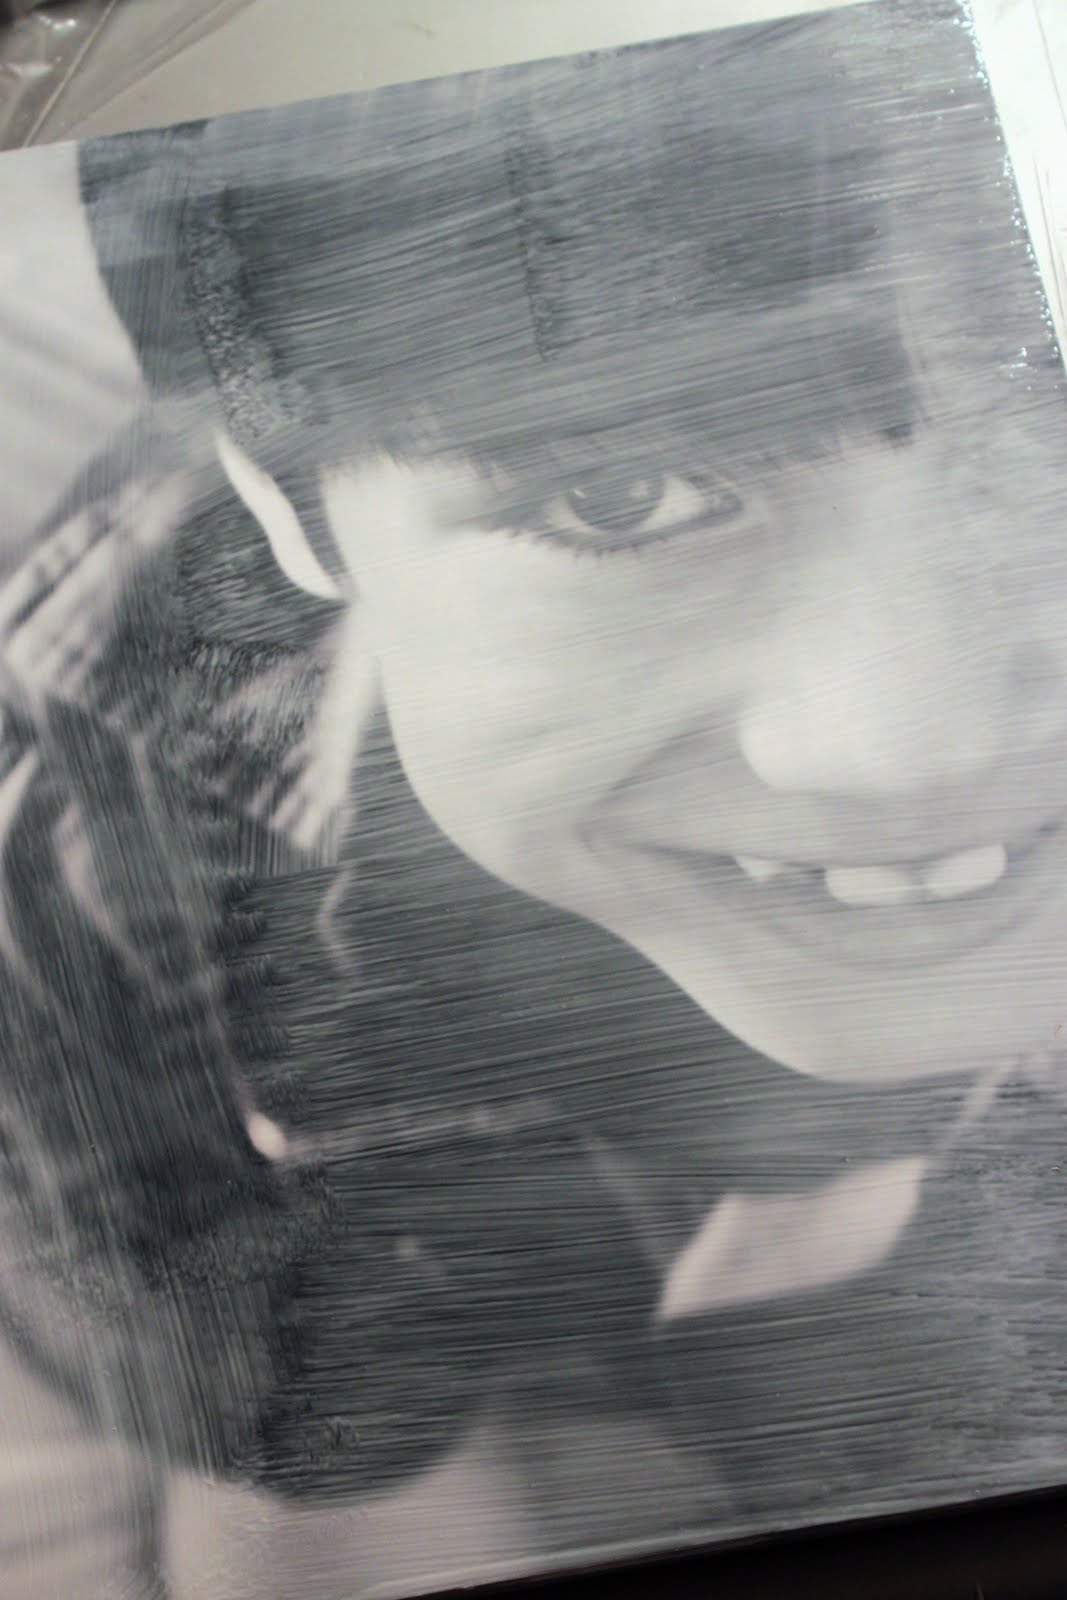
While one is drying, you can go on to the other. I became slightly impatient since it was now 1 AM so I took the hair dryer and sped up the drying time. If you do this, don't get too close to the picture. I just gave it a quick once-over.

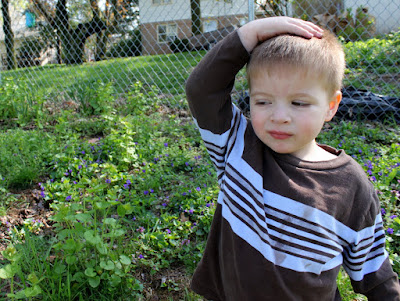
And then after it's dry, you can enjoy your "canvas like" prints for a fraction of the price!


If you are looking for someone to take a high-resolution photograph so that you can do this, just let me know, I'd be happy to snap away.


Total spent:

2 pk canvas $7.99

11 x 16 prints, $6.99 each (used a 30% coupon)

Mod Podge $2.69

paint brush $1.00

Total: $27.19, including tax


Monday, June 27, 2011

This little light

It's finished and has been making the rounds.


Thanks to Apartment Therapy for the write-up, my little light is enjoying its 15 minutes of fame.
It's also been featured over at a few blogs which I plan to highlight some time. I received a sweet email telling me it has been all over Pinterest too so I had to go there and see. Unfortunately it was in its unfinished state. I debated on not showing it until it was all said and done but I couldn't wait. I do things in real time -my life and kids, work, cleaning house, running around - that all comes before projects and sometimes during, so then I have to stop and catch up. That's just the way it is around here.

So sometimes you'll just get the current status of a project and may have to visualize the rest until I can carve out time. But I'll get there eventually! You can see the project's stages
here and here. The finished project and how we had to customize the way it hangs can be found here.


If you think that is cool, wait until you see the next project Jon and I have slated! We were just talking about it this morning and are planning to start on it this weekend if the weather is nice. I can't tell you how excited I am. It's been in the vault, aka my mind, for a long, long time.
It has to do with these grey beauties.

Friday, June 10, 2011

Paint stir sticks - a new look in lighting


Riddle:
What do you get when you cross an old thrift store lampshade with 50 million paint stir sticks?


This


Okay it was more like 42 stir sticks but who's counting? Probably the paint desk people. When I asked if they sold them in bulk, they answered, "No, take as many as you want." I told them I needed a lot and they said, "Go on, go ahead, take a bunch."


So I grabbed a bunch, pretended I didn't notice they were looking at me funny and ran out. I did this over and over until I had the amount I needed. Sometimes I tried to be a little more nonchalant about it by saying "Oh, how did 12 paint sticks end up in my cart?? Crazy kids, ha ha ha." during checkout. When in doubt, blame the 5 year-old.


I'm sure there is a picture of me behind the desk warning the clerks of the crazy lady with a stir stick fetish. No fetish, just an idea I had to see through.
(But if you've ever worked retail there are those pictures behind the desk of serial returners, bad check writers, irate customers and other types. Just a little fyi.)

Anyway, I have had this idea on my mind since I saw it on HGTV about 3 years ago. And when I found this huge lampshade, I knew what I wanted to do with it. Then I made a mistake by dismantling it and couldn't put it back together correctly even after several attempts.


So, I found another shade ($2.00) which was smaller but left it intact and just hot glued the stir sticks to the outside, adjusting each one in order for the sticks to go around as straight as possible.


After I give it a coat of stain (since the stir sticks are made out of wood) and prime and paint the underside so the logo doesn't show, she will be ready to put into place. I am using the existing light fixture in the entrance so it will need to be painted as well (see 1st picture) and then I can finally see how this will all turn out and you'll be the next to know.

Sunday, April 24, 2011

For the past few weeks


I've been doing a little of this and a little of that, like...

measuring


taking pictures


crafting
playing


anticipating


and blogging about other stuff over here.

Tuesday, March 22, 2011

It's egg-cellent


It's almost time to start on my Easter place card holders! I'm re-posting last years project here on my main blog, Enjoying the simple things and its follow-up here. A friend suggested coloring the eggs first so I may try that this year. Stay tuned for new results.


***************************************


Linking to


Monday, March 14, 2011

Pi day and a freebie


Got a tip from Coupons are Great that Blockbuster Express is giving a FREE DVD Rental tonight (March 14, 2011) only.
I know this works because I've done it before.
Enter the code MONDAYFREE when it asks for any special discount codes. You still have to swipe your credit/debit card because if you don't return it the next day, you will be charged.

So go ahead, nab that movie you've been wanting to rent and since it's Pi Day, (3.14) whip up some kind of yummy pie and enjoy your evening!

Wednesday, March 9, 2011

Look what a little thrifting will get you

A round-up of the newest acquisitions
Bamboo patterned McCoy pottery, $1.99, Thrift shop.

Slate top table, $17.50, Antique shop.
(Originally $26.00 marked down to $20.00)
Vintage child's chair, $17.50, same antique shop as the table.
(Was marked $26.50)
Bought together = better price bundle.

I'm not the only one who likes it. Here it is in Traditional Home magazine.

Light for over the sink but still has to be rewired, $5.00, flea market
Small fan, $18.00, same flea market
Yellow vintage Pyrex, $3.00, flea

All for under $65.00. Not bad for a few weeks, eh?
Stories on thrifting these items on my main blog here.
and here.

See me and others on Tales from Bloggeritaville